Search This Blog

Showing posts with label saws. Show all posts

Saturday, 14 May 2011

Saw Handle Design

The interface between tool and user is a critical component of tool design and even subtle changes can have a marked effect on how the tool works.

Take this beautiful Thomas Turner tenon saw for example, the grip is reasonably vertical with a pronounced bulge in the back. To understand the reason for this we need to consider the 'hang' of the handle. A tool with a straight handle (like a gents saw or a carving knife) gives a great deal of control. Wafer thin slices of roast beef or finely executed joinery... In contrast a tool with a more vertical handle (like a steel framed bowsaw or a plane) is all about maximum transfer of power.

In this example we have a bit of both but the emphasis is on power. English backsaws can be steered left or right for the first few strokes, after that the kerf, gravity and the set (the amount by which the teeth protrude left and right from the saw plate) take over and do all of the steering for you. To begin the cut with this saw you would grip at the top with your thumb and extended forefinger and relax the rest of your hand to maximise your control.

With the workpiece secured in the vice so that the cut is plumb , all you have to do is feel for the zero moment when the back is directly over the teeth and gradually allow more of the saw's weight rest on the workpiece. With a new saw you have the advantage of being able to observe the reflection of the timber in the side of the saw plate too - if the reflection seems to carry on straight through you know the saw is plumb. With an old one you need to be more conscious of feeling for vertical, the weight of the saw is all in the heavy brass back, making it more 'tippy' so the point of balance should be relatively easy to feel for.

Once the kerf is established you can relax your thumb and forefinger and tighten up a touch with your little finger and the heel of your hand, this changes the grip from the top part of the handle to the bottom part - from control to power. By this stage there is no steering to do, the kerf is holding the spine perpendicular over the teeth, the spine is providing the weight to keep the teeth engaged and the set is ensuring that the left and right teeth are bearing equal measures of the work so the kerf stays straight. The faster you go on the push stroke, the more material you will remove with each pass, and as long as you don't grip too tightly and pull it off course, the cut will continue dead plumb and true.

Whether you are squeezing at the top for control or at the bottom for power, your grip should always be relaxed enough that you can feel the soft flesh of your fingers give a little each time you switch from pull to push, it really is a very light touch indeed.

With sharp teeth and a well balanced set I'd be happy to bet this saw will easily eat half inch oak at a rate of an eighth of an inch with each stroke. A new one with a much thinner plate and harder modern steel would possibly manage double that.

If you fancy having a go at fine tuning your own saw handle shape we have Atkinson Walker tenon and dovetail saws available in kit form with full instructions and downloadable templates. The Pax 1776 range were also designed to be adjusted to suit the individual user, the finish on the handles is just straightforward Danish oil (tung oil) so any alterations you make can be easily blended into the original finish.

Tuesday, 2 November 2010

Saw Handle Instructions

Woodworking saws

Thanks to some very generous assistance from Aiden (The Tiddles) of UK Workshop, we finally have handle plans available for the Atkinson Walker saw kits. Thank you to those who have been waiting for them.

Download saw handle templates here.

A step by step guide how to make your saw handle can be found here.

The guide to sharpening and using your new saw is here.

For an intermediate woodworker, these kits are great fun to make and you end up with a fantastic set of saws that you will enjoy using for many years. They also give you an appreciation of how much work goes into producing top-end handmade saws and perhaps even a few new skills that you can transfer to other projects.

Sunday, 11 July 2010

A Visit to David Charlesworth

David Charlesworth

I dropped in to visit to David Charlesworth's superbly appointed workshop on the beautiful Hartland Peninsula in Devon last week. David and his students were examining the task of sawing to a line. David has a painstakingly methodical approach to woodworking that drives some people nuts, however the result of his academically thorough analysis is often a simple 'now-why-didn't-I-think-of-that-before' alteration of technique that saves a bunch of time and effort. Here's an example:

When sawing to a line you normally rest the saw on the compressed side of the cut. If you are holding the saw with a light touch, have the timber perfectly horizontal in the vice and keep the blade perpendicular to the workpiece, the saw drops in diagonally during the first couple of strokes and the left hand side of the kerf proceeds along the line.

Rob Cosman advocates starting the saw on the solid timber adjacent to the knife line to take advantage of the way it naturally moves along the path of least resistance until it reaches the mark like this:

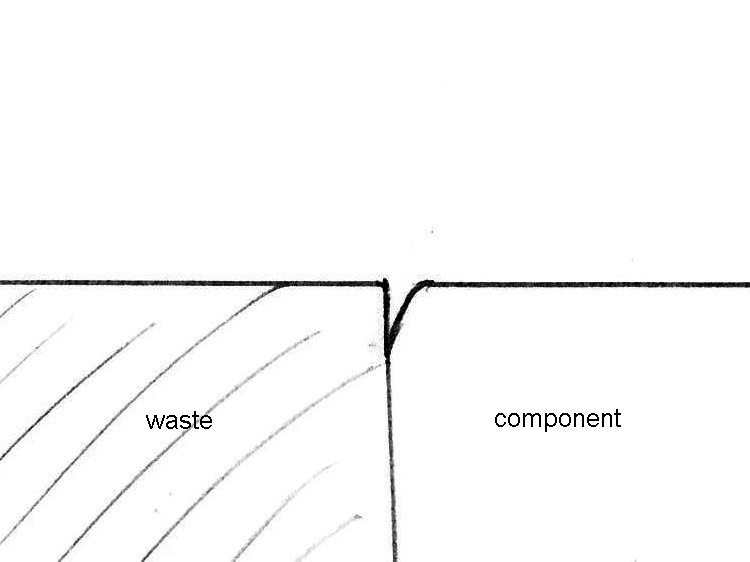
Now consider a situation where you are forced to cut on the uncompressed side of the knife line - for example cutting dovetail pins that have been marked out using the tail board as a template:

If you try to balance the saw on the waste it will naturally want to fall towards the unsupported side and you will end up cutting the component rather than the waste.

One solution that David picked up from Robert Ingham is to offset the template component to compensate at the layout stage. The amount of offset required varies depending on the kerf of your saw and the angle of your dovetails but Robert's rule of thumb is to have the tail board overhanging towards you by about 1.5mm.

The alternative method that David and I arrived at was to mark out on the line that you want to cut and then lay a chisel into the layout line to guide the saw for the first couple of strokes until the cut is established. Metal on metal is not ideal, so making a simple wooden chisel from something harder than the workpiece for the purpose would be the best solution.

Because the fibres on the bevel side of the cut have merely been compressed rather than cut, they can be made to expand back to their original position with the application of a dab of water after the joint is assembled, indeed the fact that they are compressed makes for easier assembly and a reduced chance of damaging the edge during the process:

David runs short 5 day courses throughout the spring and summer and a long 12 week course starting in September.

Tuesday, 6 October 2009

New Mora 2010MG

Green Woodworking Knives

Just in, news from Mora of Sweden that the military green version of the new 2010 is going into production. The 2010 uses the same stainless steel blade as the popular Mora 2000 but has a more ergonomic handle with a finger guard and small ridged areas for extra grip with a variety of holds. The handle is made from a similar material to our Gyokucho Eva grip saws - a hard plastic that feels soft to the touch and is amazingly grippy, even with wet hands.

As a general purpose knife I reckon they have got these just about spot on, the scalloped tip means you have a strong blade for heavier work but a fine, slightly flexible tip. We are be among the first companies in the world to stock the civilian version of this knife and will have the military version in stock as soon as the first batch are finished.

Tuesday, 29 September 2009

Chop Chop!

industrial saw blade

In accordance with my policy of ‘if I wouldn’t use it in my own workshop then it doesn’t go on the website’, I thought I should treat myself to an Atkinson Walker industrial blade for my mitre saw - and a very satisfying piece of engineering it is too!

The industrial blades are all heat treated at the factory and cooled under pressure, forcing the crystalline structure of the steel to form flat. They are smithed and tensioned by hand (see picture above) to fine tune the internal tensions in the steel. The result is a blade that is not only very flat and very round to begin with, but stays that way when you generate frictional heat around the perimeter but not in the middle.

Huge chunks of carbide are then trifoil braized onto it and ground by some seriously clever machines to a tolerance of one hundreth of a millimetre, before it goes back to the Smithing shop for a final fettle and inspection.

The saw is listed as requiring a 254mm blade but Chris Walker informed me that almost without exception a 255mm will fit. The whole 254mm thing started out as a marketing ploy to try and restrict customers to buying blades from the equipment manufacturer. Sure enough the standard 255mm fits just fine and the performance is out of this world.

It does take a little bit more grunt to get it spinning (it’s nearly twice the weight of the CMT blade I took off) but once it’s moving the blade runs soooo sweetly, it produces beautiful, almost planed, surfaces with barely a whisper of fluff left behind on the exit side, absolutely marvellous!

The thing that continues to astound me is how the Italians and Americans have managed to gain such a strong foothold in the UK market when we make sawblades of this quality in Sheffield. What's more, I can post it back to the factory to have it resharpened up to ten times for a fraction of the price of a throw-away blade.

Thursday, 27 August 2009

Saws to make your mouth water!

Gyokucho Japanese Saws

I've just received a big pile of parcels from Gyokucho Japanese saws. I don't want to let too much out of the bag yet, but this little treasure was among them.

The Kuroko is an ultra lightweight yet incredibly fast pistol grip saw. The whole thing including the sheath weighs 10 ounces and the saw itself only five, but boy does it get through timber at a rate of knots! A mate popped round while I was taking pictures of them for the website, took one look and bought the one I was photographing on the spot.

Speaking of saws, I've also fixed a date next week to go up to Sheffield for product training with Atkinson Walker. Their range of circular saw blades is mind boggling to say the least, but if we are to list their full selection of hand smithered loveleyness, I am determined to understand every aspect of them in order to ensure that customers can get the best advice possible on which blade to choose.

Thursday, 20 August 2009

Now THAT'S a tenon saw!

Pax Saws

14 inches of best CS80 high carbon spring steel, toothed for hardwoods, with a hand polished, folded brass back and a hand finished, closed handle in selected elm.

I commisioned these saws in response to a request from a customer for a pair of big saws with closed handles, specifically for cutting tenons in hardwoods. Whist doing my research I soon discovered that over the last 100 years or so, tenon saws have evolved to meet the needs of joiners as this has historically been the bigger market. It hasn't been sudden, just a gentle process of allowing cabinetmaking saws to drift out of the catalogue pages, but process has now evolved to the point where people think that a tenon saw is 'wrong' if it doesn't conform to the joiners standard of a fast cutting aggressive saw that is rarely, if ever, actually used for cutting tenons.

By all accounts, a proper cabinetmakers tenon saw is a finer toothed beast that relies on a long stroke for its efficiency. It should start easily and flow smoothly and accurately through the cut, leaving a perfectly square edge and a barely repressable urge to go and cut another one right now! (handy if you've got several to do).

I was on the point of making the commercial decision whether to just have the two made for the customer, or to go the whole hog, put in a proper production order and stock them, when I read this in an article by David Savage:

"It will be a sad day when a cabinet maker can't actually pick up a saw and cut a piece of wood dead straight, trim the end of a tenon or cut a mitre just shy of the line. But sometimes it feels like that day isn't too far away"

Well sod that, I thought, and promptly put my money where my heart was and ordered the first batch.

Christian Ellis has been an absolute pleasure to work with on this project. Even with my "sorry but the handles are not quite right, can you re-do them please" shenanigins, he has been a consummate professional throughout, and should be more widely recognised as one of the rising stars of proper English toolmaking. The first batch arrived last week and the rest are trickling in as and when Christian can get hold of elm that is of an acceptable quality for the handles.

So here it was, the moment, the first test cut! I selected a nice piece of oak, stood it up in the end vice and....judder. All that effort and I've managed to come up with a saw that flippin' judders!!! Then it hit me, new saws need a run in period of slow feed rates and thinner workpieces, they are too sharp to begin with and that is why they grab at the timber. Switching to the front vice, I made a series of perpendicular cuts through the narrow section, every one getting progressively smoother than the last. Finally I gave the blade a coat of Shield Technology ProtecTool wax, including the teeth, and switched to a piece of english walnut. What a world of difference, the saw started well and continued to cut smoothly right down the cheek. Back to the oak, same thing again, and it was making much better progress through the timber than before.

A week or so later I am loving this saw more and more every time I use it, it just gets better and better! After correcting the set for my cutting style with a single stroke down the left side of the teeth with 3M 40 micron PSA lapping film it cuts absolutely square and true and we have developed a comfortable smooth working rhythm.

All in all, I'm extremely pleased with how these saws have worked out, and I hope that with them we will be able to fend off David's sad day for another generation.

Tuesday, 4 August 2009

Sharpening and Using English Backsaws

Atkinson Walker Saw

A couple of weeks ago I put together a set of guidelines on how to sharpen, care for and use English Backsaws. Sharpening is easy enough once you know how, but can be an onerous task the first time around, similarly people often have problems starting a cut, but with a little explanation the problem is easily solved. We now send out a paper copy of this with both our PAX and Atkinson Walker ranges of backsaws and backsaw kits.

For people who are not yet customers and those who have bought these products from us in the past but didn't receive a copy with their order, a pdf version of our saw sharpening instructions is available.

Speaking of backsaws, I have just finished carving some lambs tongues into the handles on the prototypes for the gorgeous new PAX 1776 heavy tenon saws, which will be available shortly. One final prototype has gone down to Mark Baker of Furniture and Cabinetmaking to be reviewed in a forthcoming round up of all the top tenon saws on the market. The other is on its way up to Sheffield to be used as the sample so that Christian can carve and sand the production ones to the same spec.

Peter Benson's detail selection carving tools were an absolute godsend for this job, so I've included some in the package going to Sheffield.

Prices for the new saws will be £125 each or £225 for a pair, including VAT and carriage.