Search This Blog

Wednesday, 12 December 2012

The Quangsheng No.1 Smoothing Plane

The Stanley Bailey No.1 smoothing plane was produced from 1869 to 1943 when it was dropped from the range, presumably because of the squeeze on resources brought about by WW2. They were never produced in large numbers so their comparative rarity makes them a favourite with collectors and they now command astonishing sums at auction.

Like the Stanley original, the Quangsheng No.1 has a 1-1/5" wide iron, a bailey pattern frog and no lateral adjuster. Sales volumes of these planes have naturally been lower than those for the full size bench planes and production of them ceased about a year ago. I was able to get a single one made as a special gift to thank a friend - possibly the only time a factory in China has produced one of anything!

Having come face to face with one I wished that I had ordered some while they were still being made.  Three points in particular struck me:

They are perfectly suited for children and much easier for them to use than a block plane. Imagine how fast you would go off woodworking if you had to do all your planing with a 60-1/2 that is the size of a shoe box!

America is now a very much more wealthy nation than it was in the late 1800's and the American people are naturally interested in collecting the tools that their forbear's made. If I had a time machine and could go back to an 19th century tool shop I'd clean them out of mint boxed Stanley No.1's in a heartbeat! Now take a punt on where China is going to be in 100 years time.

If the original was in production for 74 years it must have been bought and used by someone, mint examples are thin on the ground, so the people who owned them must have used them.

Although they are no longer in regular production, we have managed to get a small batch of Quangsheng No.1's made. Whether this will happen again in the future is anyone's guess.


Beautiful tools, great prices, friendly service!

Wednesday, 5 December 2012

Independence knife!

I have a curious relationship with knifemaking, I might do 15 minutes here and there, sometimes weeks apart, and then get a sudden rush of inspiration and can't stop for anything until I've seen the job completed. Today was one of those days.

There were a couple of useful tips that cropped up in the process, so I thought I share them. The first is using one of these great little cylindrical cork sanding blocks (above) that come with a free bottle of wine. The cork supports the abrasive giving evenly distributed pressure, you can also roll it slightly as you are working to find a fresh bit of grit without having to reposition the paper.

A problem that I came across when shaping the handle with rasps was how to get close enough to the liners and the tang without scratching them. Even using 3M Frecut sanding would still take a while, unless I used really coarse grits and then you are back to the problem of scratches. Instead I tried using a cabinet scraper which proved to be fast, controlled and didn't scratch up the metal anywhere near as badly.

The blade for this knife was made by Chris Grant, a long standing friend and very accomplished bladesmith. It was made from our laminated white paper steel using the stock removal method and then given one of his awesome heat treatments. I won't give away Chris's secrets but he can make steel do wonderful things. You could literally shave with this thing!

As this is going to be more of a working knife than Amelie I went for a slightly blockier handle shape, one bit that turned out really well was a tiny almost imperceptible thumb depression on the top of the blade, this gives a really nice grip for controlled woodworking cuts.

Well I guess that's about it, but I do have one last special surprise for Chris....


wood blanks for knifemaking
.....Tartan Wood!


Beautiful tools, great prices, friendly service!

Friday, 30 November 2012

A Cornucopia of Christmas Deals!

Twelve consecutive one day sales featuring 12% off a different brand each day.


Offers change at 9am daily and are only available while stocks last.

Starts December 1st

Don't forget to tell your friends!

To find out which brand will be discounted on which day, just click on this picture of a gorgeous new Narex paring chisel:

Beautiful tools, great prices, friendly service!

Wednesday, 21 November 2012

Improved Quangsheng No.6 Bench Planes

Quangsheng No. 6 Bedrock Pattern Fore Plane

I must confess that we have been supplying the new version for a while now but I have resisted the temptation to mention it until we had more stock on the way - sack cloth and ashes for me later! Although we only have a small number on hand at present, rest assured there will be more arriving in time for Christmas.

So what's new?

First of all the position of the handle, on the newer version (at the front) the handle is tucked up much closer to the frog. Changing this is no small undertaking as it means making a whole new set of patterns that the plane bodies are cast from. The new position makes it easier to reach the depth adjuster on the back of the frog without altering your grip.

Personally I subscribe to the 'have the plane set correctly then approach the workpiece' school of thought so it has never really bothered me, but I know there are those who prefer to make depth of cut adjustments 'on the fly'.

The handle itself is now a little bit taller giving more room for the fingers, a little bit chunkier and with a more pronounced forward lean.

The No.6 remains my favourite size of bench plane, long enough to achieve accurately flat edges up to 6 feet, broad enough to tackle large surfaces and yet still of a manageable size to use for extended periods or with a shooting board.

Beautiful tools, great prices, friendly service!

Monday, 12 November 2012

Workshop Heaven Free Shipping Fortnight

Workshop Heaven Free Shipping Fortnight

Our scheme to encourage customers to get their Christmas orders in early and therefore spread our Christmas workload is well and truly underway.

The team was working like a well oiled machine this morning as we picked, checked, packed and shipped three times as many orders as we normally would on a Monday.

As well as free shipping, we have a host of special offers on including selected Clifton and Quangsheng planes, Narex and Ashley Iles chisel sets and BTI Systainers and Accessories

If you want to get a piece of the action there are no codes to enter, just choose the free shipping option at the checkout - job done!

It will be tricky, but time permitting, I will also try to get a proper informative blog post ready for next week.

Sunday, 28 October 2012

Halloween Special Offers


10% OFF


Enter the discount code
GOBLIN
at the checkout to claim your discount.
This offer will mysteriously disappear at midnight on the 31st of October.

Friday, 5 October 2012

Mythbusting Flatness (part 1)

straight edge for measuring flatness

Flatness is possibly one of the more widely misunderstood aspects of precision woodworking, by experienced and novice woodworkers alike. Most woodworking courses tend to start with sharpening and tuning - because you can't work without sharp well-tuned tools. I would suggest that a better starting point might be a theoretical understanding of flatness, because with that you can better understand what you are aiming to achieve when sharpening and tuning - and save yourself bags of time and effort in the process.

Right, goatee beards and berets at the ready - let's bust some myths!

Perfectly flat! - BUSTED!

From an engineering perspective, absolute flatness is a conceptual state that is approached to within a given tolerance. Nothing has ever been made that is absolutely 100% flat, however we can get extremely close to it. Good quality reference surfaces like straight edges and surface plates will have a stated tolerance, the smaller the tolerance the closer the tool is to flat, straight, square etc. The smaller the tolerance gets, the more expensive it becomes to achieve.

It is worth mentioning that the tolerance on a straightedge is one of the factors that needs to be taken into account when expressing the measurement taken against it. Avoid buying cheap tools described as 'precision' but without a stated tolerance, you are genuinely better off with a banana. A straightedge with a 0.003" tolerance might sound impressively straight, but if you go to take a 2 thou measurement against it, you could be out by 75%. Would you buy a tape measure that gave you two feet plus or minus 18 inches?

I have scoured the suppliers for a straightedge that is both reasonably priced and sufficiently accurate and settled on the Bowers Metrology 465 Engineers Straightedge (same company group as Moore & Wright) which gives accuracy of 0.0005" over it's 500mm length and still comes in on the right side of £75 (at the moment).

Rub it on a flat thing. - PLAUSIBLE! (sometimes)

A common myth is that rubbing something on a big flat abrasive surface will automatically make it flat too. However, when you think about it, every slight variation in pressure as you move the object over the surface will have a cumulative effect. The flat surface prevents you from making it concave, so what this process actually achieves is altering the condition of the surface in the direction of convexity. If it was concave to begin with then you will indeed be making it flatter, if it was flat or even minutely convex then the only possible outcome will be greater convexity. Abrading on a larger abrasive surface is a useful technique, but only when it is understood and used appropriately to reduce concavity or intentionally introduce convexity.

When it comes to making wood flat with a hand plane we use 'stop shavings' or shavings within the length of the workpiece to introduce very slight concavity (equivalent to the depth of cut over the length of the sole). These are followed by 'through shavings' that move us back in the direction of convexity - too many through shavings and you will end up with a convex workpiece. Although the tools are different and we are cutting rather than abrading, the principles are exactly the same: approaching flatness from known concavity in a controlled manner.

Concavity can be introduced or increased by working the object over an abrasive surface that is smaller than itself. In the case of a woodworking chisel, this can be achieved by working across the width of the sharpening stone, or if lapping a plane by using a piece of abrasive that is shorter than the sole. Once the surface is uniformly slightly concave it can then be worked on a larger abrasive surface to bring it back towards flat.

measuring flatness of a bench plane

I've seen the light! - Plausible! (But it ain't a measurement)

Seeing light under a straightedge or square is not a very satisfactory method of inspection because light is subatomically thin. Take a bench plane that is flat to British Standard of +/-1.5 thou on centreline for example. An optic fibre core has an external thickness of 1/3 of one thou (that's the thickness of the tube as well as the hole for the light inside it). In other words you could stack eight optic fibres on top of each other and slide the lot through a three thou gap. A feeler gauge on the other hand gives you a definitive yes or no answer about whether the gap is bigger or smaller than the thickness of the feeler. The only thing light can do is tell you whether or not you need to bother getting the feeler gauges out. In other words it's a quick initial check, seeing no light is an automatic pass, but seeing light only identifies a need for proper measurement.

A word about tolerances

Tolerances are usually expressed as 'X thou maximum total deviation on centreline' if you think of this as 'would an X thou feeler gauge go under it?' you are using the appropriate numbers. They can also be expressed as +/- Y thou, this gives you the deviation up or down, so to check for it you would need a feeler gauge twice as thick as Y thou. You can also have unilateral tolerances that only allow deviation in one direction, for example =/- Z thou allows for a concavity of Z thou with no tolerance for convexity.

If you have any questions or comments please feel free to post them here and I will do my best to answer them. In part two we will get a little deeper into the specifics of tool tuning and sorting out some of those eBay horrors.

Tuesday, 25 September 2012

Rescuing Endangered Orange Frogs

I'm not an antique tool collector (honest!) and I don't normally visit boot fairs, but last weekend my wife was invited to visit a local boot fair with a friend and on her return mentioned that there were a couple of stands selling old tools. I'm still not entirely sure why, fate, instinct perhaps, but after an hour or so of wrestling an irresistible urge to peruse the stalls, I gave in.

One plane in particular caught my eye, a type 11 Stanley low knob 5-1/2, the handle was cracked but everything was complete and original.

The stallholder then told me that he also had a No.7 in the car if I was interested, not a low knob but certainly another pre-war keeper. By this point it had started to rain and it was unfair to keep the poor bloke dithering while his stock got wet, so I asked him for a price on the planes and accepted his very reasonable offer. I can't stand all this haggling back and forth for the sake of a fiver - this is England after all, not Marakesh.

Having returned home I consulted the oracle of all things Stanley (Patrick Leach's Blood & Gore) and discovered that my instincts had served me well. The low knob 5-1/2 was indeed complete and correct and a gentle rub with a rag and some ProtecTool microcrystalline wax revealed the words 'Stanley, New Britain, Connecticut, USA' on the iron. The Patent marks and lack of a ring in the casting beneath the knob dated it to between 1910 and 1929 and the low knob placed it as pre 1920. Bingo, it could have been a period prop in Downton Abbey!

Whilst gently wiping the accumulated grime off the No.7 I noticed that it had various flecks of gloss paint on it. Why do so many planes get splashes of paint on them?  Further inspection revealed that both sides of the frog were covered in orange paint, this was different though, if someone had dropped enough orange paint on the thing to cover the sides of the frog, then surely there would be signs of it elsewhere.

Back to the internet, which revealed that during a very brief period Stanley USA took to painting the sides of their plane frogs bright day-glow orange, then as quickly as they had begun they stopped. The plane is a type 15, which were only made for two years (1931-32). Orange frog type 15s are extremely thin on the ground and because No.7s aren't made in anything like the same volumes as smoothers and jack planes, this turned out to be a very rare beast indeed. The irons were not contemporary to the plane, but hey, how much luck can you expect in one day?

Wednesday, 15 August 2012

New Product Range: Elmer's Glue

Elmer's Carpenter's Wood Glue Max

Elmer's have been making adhesives for over 60 years and have become an iconic American brand.

The products are very safe, Elmer's started out making kids glue and remain the market leaders, so much of the brand marketing is child friendly and fun. The original Elmer's Glue-All is still available and the formulation is continuously being improved to include the latest advances in adhesive technology.

In 1975 Elmer's entered the woodworking market by introducing the first sandable fast-grabbing wood glue (aliphatic resin) combining enhanced strength from long chain polymers, the user friendliness of PVA and the grab of traditional hide glues in one product. Elmer's Carpenter's Wood Glue and the stronger, waterproof, stainable Elmer's Carpenter's Wood Glue Max (pictured above) are the modern descendants.

The firm continues to deliver market leading innovation and has recently introduced Elmer's Glue-All Max, an impressive low-foaming polyeurethane glue that gives you the massive multi-material sticking power of polyeurethane, but with considerably less mess.

Thursday, 9 August 2012

Systainer Explainer Part 2

Internal Storage Solutions for Systainers

Please click on any of the images for a better view.

The easiest way to understand the space inside T-Loc Systainers is to think of the internal depth as 65mm plus multiples of 50mm.

T-Loc Systainer 1 = 65mm

T-Loc Systainer 2 = 65mm + 50mm

T-Loc Systainer 3 = 65mm + (2 x 50mm)

T-Loc Systainer 4 = 65mm + (4 x 50mm)

T-Loc Systainer 5 = 65mm + (6 x 50mm)

Systainer Insert Trays
BTI Insert Trays

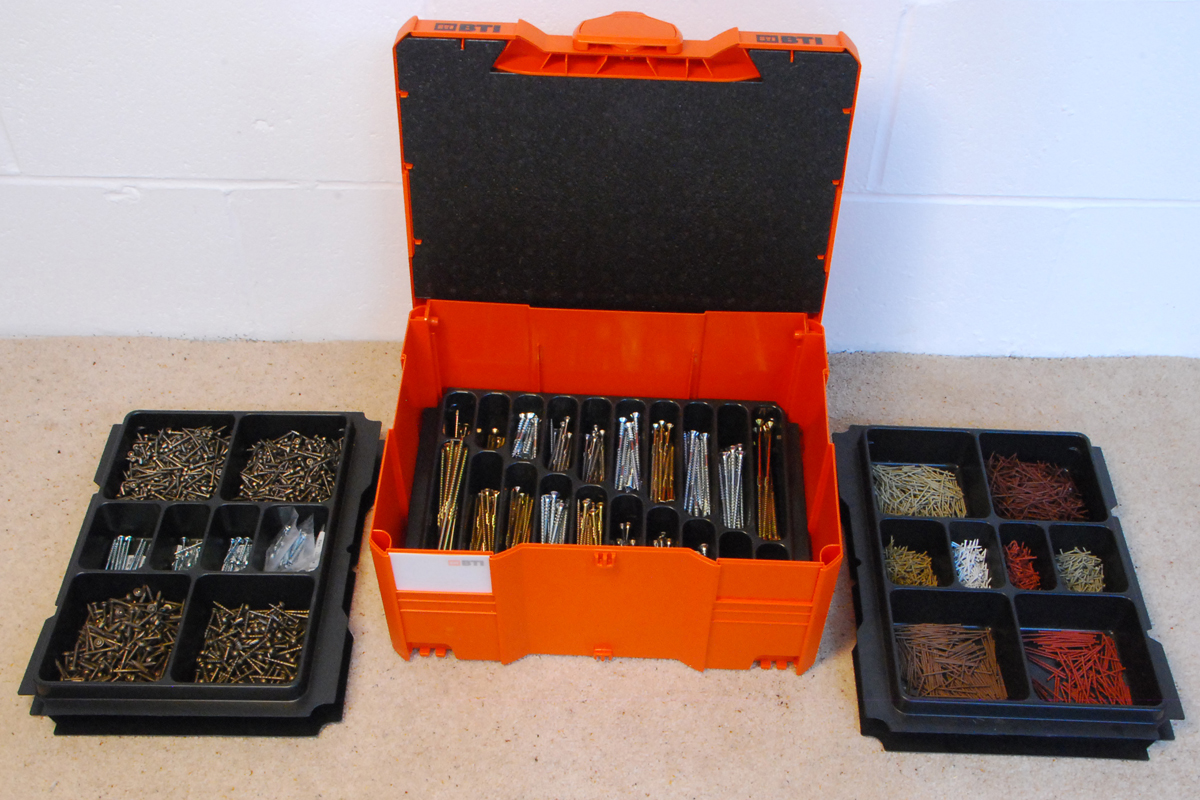
Conveniently, the vacuum moulded insert trays come in 65mm and 50mm depths. The 50mm stacking insert has a skirt on the underside that covers the compartments of the one below. So you can have any one of the ten 65mm inserts (B through K) on the bottom, and then the appropriate number of stacking inserts (A) to make up the depth of the systainer.

Systainer insert trays are ideal for storing small items like screws and nails. If you use these inserts as designed and in conjunction with one of the polystyrene covers that fits inside the lid you should be able to hold the closed systainer upside down and shake it without any of the contents getting mixed up.

Dividers
BTI Dividers

There are two types of systainer dividers, the first is a simple version which slots together using cellarette partition joints, these have the advantage that they can be disassembled and stored flat when not in use.

The second type are permanently assembled but have a skirt so that when they are stacked within the systainer they effectively seal the compartments beneath.

BTI Stacking Dividers

The dividers for systainers 2, 3 and 4 are 7.5mm shy of full depth, so that they can be stacked in a bigger systainer. For example, you can fit systainer 2 and 3 dividers (or two systainer 2 dividers and a stacking insert tray) into a systainer 4 and still close the lid. Systainer 5 has a thicker X reinforcement moulded into the base, so you can have any one divider and then top up with stacking insert trays (e.g. Systainer 4 divider + 2 stacking insert trays).

Foam and Waffle pads
BTI Lid Insert and Waffle Pad

Another versatile way to use the space inside systainers is to use foam pads and waffle pads. Each pad is 25mm thick, the foam pads are compressible, the waffle pads are not. Waffle pads (also known as ‘pick and pluck’ foam) are partially pre-cut into squares, so you can remove squares to form a void in the shape of an object you wish to store. If you want a more precise fit, the foam can also be cut using a hot wire or scalpel.

In this example I have used waffle pads to create a bespoke storage case for a jack plane, block plane, additional cutting irons and some marking and measuring tools. Waffle pads cushion the stored items from all sides, affording them maximum protection.

Systainer Toolbags
BTI Toolbags

Systainer toolbags are double sided rigid boards with ballistic nylon pockets on both sides. They slot into the systainer toolbag guide, a two piece frame that drops into the base and rear side of a systainer 4. You can have any combination of four toolbags from a range of six configurations. If you are using them in a systainer 4 (as shown) the tools need to be no longer than the top of the board, if using a systainer 5 you have another 100mm which can be handy for files, rasps, longer chisels etc.

Systainer Filing Frame
BTI Office Filing Frame

The systainer filing frame drops into a systainer 4 and accepts standard A4 suspension files. Ideal for project management – I even use one of these in the office! The filing frame is compatible with both Classic Systainers and T-Loc Systainers, so it can also be used with the lockable Classic Systainer 4. N.B. Classic systainers can be combined with T-Loc’s in the same stack but the T-Loc’s have to go on top.

Briefcase
BTI Office Box

The Systainer office lid insert converts your systainer into a briefcase with pockets for documents, diary, pens and business cards. I now use a couple of plain foam inserts in the bottom of the box to sandwich my laptop and prevent it from being scratched by the plug on it’s power cable (again - ouch!)

Cartridge and Aerosol Inserts
BTI Cartridge and Aerosol Inserts

These expanded polystyrene blocks drop into the bottom of a systainer 4 or 5 to hold standard 70mm aerosols and 52mm cartridges (sealants, adhesives, etc.) with spaces for nozzles.

Maxi and Mini Systainer inserts
BTI Maxi and Mini Systainer Inserts

There is an excellent multi-configuration divider available for the maxi systainer, this can be used to partition the space into equal or un-equally sized compartments. The maxi systainer dividers store flat when not in use and because the leaves connect to the interior of the box as well as each other, you can fit them individually if necessary. Three formats of insert tray are available for mini systainers, perfect for storing drawing equipment, small screws, sausage rolls, etc.

Sortainers
BTI Sortainers

No analysis of the interior of Systainers would be complete without mention of the tardis-like 4-drawer or 12-drawer Classic Sortainers. These come complete with subdividers that slot into the drawers so you can organise the space within to suit your specific needs, and labels to identify the contents.

The large drawer of a 4 drawer sortainer is big enough to take a waffle pad with the sides trimmed to the length of the longer lines of squares, giving another option for customising the space inside. Without subdividers the large drawer is big enough to take a No.5 jack plane and a set of 12 bench chisels in a tool roll.

All of the systems shown here are available from the Systainer Inserts section of workshopheaven.com.

If you'd like to give systainers a go, or would like to expand your current setup, here is a handy 8% discount code valid on all BTI Systainer products at workshopheaven.com until 23:59hrs, 8th October 2012.

BTI discount code
BTI746