Search This Blog

Thursday, 16 February 2012

New Workshop Build Part 2


Things are starting to feel a little more homely in the workshop now. The main bench has been installed along with the drill press and an adjacent eye level cupboard to keep all the associated drilling gubbins in.

On the opposite side I've installed a set of shelves to keep things that come in boxes accessible and organised - power tools, socket set, screws etc. Above the shelves is a sheet of steel pegboard for hammers and mallets.

Underneath the left side of the fixed bench is a mini bench for my 4 year old son. This started life as one of the flimsy entry level benches but with the back and sides boarded over to stiffen it and the lower legs cut off, it is now surprisingly sturdy.


Over on the tool wall, magnetic toolbars have been installed to store chisels, saws rasps and marking and measuring kit. We have another eye level cupboard for small items and to save making shelves for planes I have just screwed wooden boxes straight to the wall. All of the shop walls were lined with ply which is already paying huge dividends in terms of being able to attach anything anywhere.


There are still a few more additions and alterations to make, but for the time being it is a workable setup. After the last couple of months of relative chaos, I am thoroughly enjoying being able to find things instantly without having to rummage for them.

Sunday, 8 January 2012

New Workshop Build Part 1


Here is the space that was alluringly titled 'workshop' on the plans, I have a general idea of how I want it to end up but for the time being everything is flexible and open to serendipitous influences.


The first of which happened last week when the builder kindly offered me a few boards of leftover timber that was otherwise destined for the skip – not very straight, blobbed with plaster, but a decent quantity of PAR pine nonetheless and very gratefully received.


In the true spirit of ‘use it quick before he changes his mind’ I have decided to press it into service as a secondary bench. As with all bench builds, the first thing you need in order to get started is a bench. This is my portable bench which is made from 5 x 3’s, (more skip treasure). Two simple A frames with splayed legs, two horizontals that drop onto 20mm hardwood dowels and a top attached underneath so that you can put tools down whilst still having the workpiece resting on the top rails. It’s rough but sturdy and you can clamp anywhere and screw stops onto it as needed so it is quite versatile. (All of the photos are clickable if you want a closer look)


The dimensions for the new bench were largely dictated by the space and the materials, I wanted something quite narrow so that the wall behind can be used for shelving and magnetic toolbars to keep the more commonly used tools visible and accessible. The ladder subframe is 3 x 2 PAR and will be supported on three box section legs. All of the worksurfaces in the shop are going to be 3 feet high so that work can be laid across multiple surfaces if required.


Having double legs presented the opportunity to install bench slaves in two of them to support large boards vertically for edge jointing. By drilling two offset lines of holes to accept pegs I can have a repositionable cantilevered support that sticks out of the front of each leg.


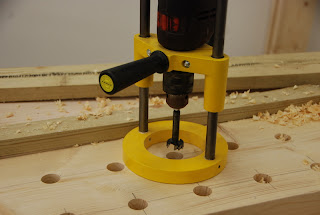
To drill the holes I am using a drilling rig to ensure that everything stays plumb and true. The 25mm Famag Bormax performed perfectly, each hole was cut with a single pass and the last hole was as clean as the first. By carefully clamping the boards in pairs with some scrap underneath I was able to prevent blowout and also transfer the hole positions to the next piece.


The ladder subframe is screwed to the wall for maximum strength and rigidity using BTI Drilltec screws. These have a drill point, an aggressive threaded section, a collar of rifling to eliminate jacking and milling ribs under the head so that they countersink themselves.


Without any pre-drilling at all they went through the timber, a sheet of ply, a sheet of plasterboard and bit home on the steels inside the wall. The torx heads fit over the driver like a spline joint over about 2.5mm, so the engagement is very much better than pozidrive.


The subframe was assembled with leather pads to elevate the ladder section slightly and provide some extra grip – any slightly compressable material will do but leather is ideal and easy to get hold of, a couple of old chunky belts in this case.


I also arranged the timbers carefully so that the bowing of the subframe and the top pieces would act against each other to pull themselves back into square when it was all screwed together.


Although this bench will be mainly used as a table to help keep the main bench clear, it was worth building it sturdily enough to be used as a working bench as well. The apron at the front provides ample clamping area and it is plenty solid enough to support morticing work or bolt machines onto if necessary.

Although the timber would probably have been recycled into paper or chippings anyway, I believe it has been put to much better use and will hopefully give many years of good service.

Wednesday, 14 December 2011

The New Workshop Heaven!


We have recently moved into new larger premises at the Alkerton Oaks Business Park, situated between Banbury and Stratford upon Avon on the A422, about five minutes drive from junction 12 of the M40.

The local area is literally dripping with history, within a couple of miles we have RAF Edgehill where the top secret E28-39, powered by Mr Whittle's jet engine, was developed into the Gloster Meteor. There is also the field of the first pitched battle of the English Civil war in 1642 and the glorious Upton House which was built just 46 years later, developed and preserved by a family that started a little company called Shell, and is now a National Trust treasure.

The Upton Estate remains in private hands and has over 300 acres of woodland, managed in accordance with the higher level countryside stewardship scheme. The estate also farms 1400 acres of arable land, producing conservation grade cereals for Jordans.


The trimmings from the woodland management scheme (currently coniferous nurse trees planted to encourage straight growth in the main crop) end up in a biomass boiler that provides heat and hot water for our new offices and warehouse. As a result the only fossil fuels that the building consumes are a splash in the chainsaw and a dash the chipper. I am hoping that when the current batch of harvested hardwoods have been air dried we will be able to offer boards of premium furniture grade timber with the minimum possible wood mileage.

The building itself is incredibly well insulated, achieving an A rating for energy efficiency. The interior was custom built to our specifications and although we have had to wait a little longer than expected to move in, giving the contractors time to do their job beautifully has paid huge dividends in terms of the quality of finish achieved - heck if we can't appreciate and encourage good workmanship nobody can!

As before, we will continue to receive visitors by appointment and once the workshop area is complete you will have the opportunity to test out your purchases on the premises and receive free tuition in how to care for and use your new tools.

Saturday, 26 November 2011

New handles for Narex 8116 Cabinetmaker's Chisels


We really, really like Narex's 8116 Cabinetmaker's Chisels, superb steel, fine accurate machining, great profile and a great price, but I couldn't help feeling that the handles would be so much better if they were just a fraction smaller on the smaller sizes. We mentioned it to the management and before you could say "To bylo rychlé!" a sample of the new handle was resting comfortably in my hand!

The first shipment of the new ones arrived today, so we will be dispatching them with the smaller handles as standard when our new website launches (fingers crossed) on December 5th.

In the meantime, please use the shipping comments box to add 'smaller handles please' or 'larger handles please' and we will send you the appropriate chisels.

Thursday, 24 November 2011

Lateral Thinking !


One of the minor points levelled against bevel up planes is that their capacitity for lateral adjustment is limited becuase the cutting iron is nestled down between the side wings.

Here's a quick and easy way to give your bevel up plane as much lateral adjustment as a bevel down one.


First mark up the sides of the iron with a permanent marker so that you can monitor your progress.


Next carefully hold the blade over a linisher (a well secured upturned belt sander will do if you don't have one). Allow the shoulder of the blade to make contact first and then gently lower the blade until the sparks start just behind your thumb. You are aiming for this (click for a closer look):


A nice even taper running from about halfway up the iron to the shoulder, taking about 1.5mm to 2mm out of the width on each side at the shoulder.

The result:


About twice as much adjustment as you had with the parallel sided iron, and the front end remains parallel so it will still fit into a side clamping honing guide.

The Quangsheng iron I am using here is differentially hardened carbon steel (only hardened from the slot down so that the soft upper part dampens vibration). Air hardening steels are all or nothing, so if you try this with an A2 blade the whole thing will be hard and it may take a little longer to grind back.

Monday, 14 November 2011

Free Shipping Fortnight!


...or you scratch my back and I'll scratch yours.

There are all mannor of things that can go wrong with an order - computer says one shelf says nil, lost in the post, defects, niggles and other fluff to sort out. True, it is rare, but it would be churlish to pretend that it doesn't happen occasionally.

We work incredibly hard to ensure that these problems never get as far as the customer, but if there is one thing that makes complete and total customer satisfaction easier to achieve it is time!

In order to sway the balance of time in our favour we are offering FREE shipping on all UK orders for the next two weeks (13 - 26 November) in the hope that we can persuade our regular customers to get their Christmas orders in nice and early. Just to spice things up a bit further we have waved our discounting wand over a selection of popular products and put them up on the homepage.

At the end of the day I don't want to spend Christmas day worrying about whether Mr Jones from Llandeilo received his Quangsheng No.4 in time. I'd much rather be enjoying the way my carefully waterstone sharpened carving knife will sever immaculate wafer thin slices of roast fore rib of beef with no downward pressure at all, or marvelling at the fact that my four year old son actually likes brussels sprouts! If you are prepared to indulge me this small favour I am more than happy to redress the balance with a bit of free shipping.

Wednesday, 19 October 2011

The Combination Square


Invented in the United States in 1878 the combination square is a very versatile instrument indeed. I thought it might be fun to run through as many ways to use one as I can think of and then see if anyone can come up with any others.

As well as the obvious uses for marking lines square to or at 45 degrees to an edge, the combination square can also be used as a depth gauge:


A rudimentary marking gauge or panel gauge:


A protractor, dovetail marker or an extra sliding bevel if need be:


A graduated centre finder for both establishing and measuring from the centres of round materials:


Or a mitre gauge:


A small level, (and because it's a square you also have a means of gauging for plumb):


A greater level of accuracy can often be achieved by using the components independantly.

The square head can be used as an internal 135 and 90 degree square:


The centre finder as an external 90 degree square (note the cutout for the corner to rest in):


And the protractor head can be used as either a level or an inclinometer:


On a good one like this Moore & Wright 520, the anti glare rule is 2.2mm thick and the sides are precision ground so it is accurate enough to use as a straight edge too:


In almost all cases a dedicated tool probably will do a better job (assuming that you are looking at a similar quality level). However, for a lot of woodworking tasks the level of accuracy you can achieve with a decent combi square is perfectly acceptable.

If budgetary restrictions are a consideration then you may be better off getting one good quality combination set than struggling with lower quality individual tools.

The sheer abundance of things that you can do with a decent combination square make it a wise investment for the beginner and it will always be a useful tool to grab whether you are working in or away from the workshop.

If anyone can come up with any other ways to use combination squares, please feel free to share them.

Thursday, 25 August 2011

Spoon Karving Cnives


Spoonerism - spoon carving knives - get it? Oh well never mind.

What you definitely should get is a set of these wonderful new spoon carving knives from Ray Iles. I've only had a brief play so far, but when it comes to a tool that you work so intimately with as a spoon carving knife, starry eyed love at first sight is a pretty good starting point.

Let's begin with the handles. Plain double turned beech ovals, but the belly is offset towards the rear, so it nestles under the middle and ring fingers before narrowing again for the little finger - hand shaped in other words. Towards the business end, the handle narrows in thickness to a slender lozenge cross section, making your index finger very 'aware' of the exact angle of the blade and able to alter it very precisely by squeezing or relaxing the grip.

Next the blades, hand forged O1, a material Ray has been using for most of his working life, tempered to RC59-61, hollow ground bevels, polished to a shaving sharp edge. I'm wondering whether I wouldn't be happier with a left bevel crook knife as I'd kinda prefer to use this beastie away from my body - maybe I'm just not used to it yet? If you are used to Moras the first thing you will notice is how much thicker the blades are (3mm). The whittling knife and the spoon knife have rounded backs so you can comfortably lay a thumb or fingertip on the back of the blade for very fine control. These two factors make a world of difference. I'm sitting here with a lap full of boxwood shavings, alternating between carving, typing, and watching in amazement as the best teaspoon I have ever carved appears before my eyes. It feels like I have swapped hands with Jon Mac!

Lastly the bit that normally gets forgotten - the tang. The balance on these knives is just beautiful. All of them balance, as they should, slightly forward of the centre of the palm. The barest fraction of weight bias toward the blade gives the necessary registration, but keeping it as small as possible keeps fatigue to a minimum so you can carve in comfort for longer. 'Full length tang' is often touted as a selling feature, but a 3/4 tang that has been balanced to give perfect weight distribution trumps it by a country mile in my book.


Ray has been making tools from the moment he could pick up a hammer, he was one of the last people to be apprenticed to the little mesters of Sheffield and is possibly the only man alive to have apprenticed under them as a Smith, Grinder and Cutler - three apprenticeships - now that's deciding on a career. The jump from making things that are sharp on the end to making things that are sharp on the sides is quite a leap for a toolmaker, but I am so impressed with these that I have decided to stock almost his entire range on the new website.

Happy spoon carving!

Oops - nearly forgot, no photos - didn't happen.

Here's the finished spoon, could probably be improved with a bit of sanding but hopefully not too shabby for a first effort.

Tuesday, 9 August 2011

Work smarter, not harder.


We have heard from a few people recently who have been trying to polish the backs of their plane irons and chisels to a mirror shine all over. This is a common enough misunderstanding and I have had to explain why it is unnecessary to some very experienced makers indeed. Most of them start out looking at me as if I have just come out of a tap and then the penny drops and they suddenly realise how many hours of unnecessary effort they have expended over the years and end up needing a cup of tea and a sit down.

The back of a chisel only needs to be polished for the first few millimetres under the cutting edge. This is achieved by hollowing the back by a couple of thou (no more) on coarse abrasives, preferably using a single line of contact to avoid the possibility of referencing off a bump. With the slight hollow achieved, you lay the blade flat on your finer honing abrasives and work just the underside of the cutting edge to a mirror finish. If you like to use the reflection in the back of the blade to gauge the geometry of your chopping cuts, then by all means carry on and polish the first 10mm. Zero to minus 2 thou is plenty flat enough for precision joinery so your chisel is still technically 'flat'.

The back of a plane iron is not a reference surface and only needs to be polished for the last millimetre. The back of a plane iron doesn't need to be flat, so elevating the other end of the blade by slipping a thin ruler / bit of paper / whatever underneath it when honing you can guarantee contact at the cutting edge.

The same goes for the irons of bevel up planes. The last couple of mm of the back is exposed in the mouth and doesn't register against anything, so there is absolutely no harm in using the Charlesworth ruler trick on them too.

If you find you are spending any more than ten minutes maximum preparing a new blade, there is a good chance that either the abrasives are inappropriate or the technique is not quite right. If you need some help, please get in touch and we will be happy to point you in the right direction.

Aside from saving a whole load of time and effort, the other advantage of minimising unnecessary polished surfaces on your tools is that polished steel is much more prone to pitting. A ground surface will tend to develop powdery surface rust all over, which if it does occur can be easily removed. The slightest imperfection in a polished surface (at a molecular level) will act like a sacraficial anode and fester away independently of the surrounding surface.


Thursday, 21 July 2011

David Barron visits Workshop Heaven


David Barron popped in today to drop off a copy of his new Dovetailing DVD and some Knew Concepts jewellers saws for me to try.

Man are these things light - but it's not just how light (120g vs 185g for our standard 5" jewellers saw) it's also how that weight is disributed. With a standard saw most of the weight is in the frame, resting on your index finger with 5" of mechanical advantage. With the Knew Concepts saw the majority of the weight is in the handle, so although it is only 1/3 lighter it actually feels about 2/3 lighter in the hand. They are also very stiff, so you don't get any compression of the blade on the forward stroke which is the biggest cause of blade fatigue.

Tension wise, they are about the same (although our standard adjustable frames do achieve a much higher tension than just about anything else on the market) with a heavier gauge skip blade installed what you really want to hear is a very short, high pitched 'plink', if it's still going 'pingggg' it's not tight enough.

The weight advantage makes the 8" version a no-brainer for me, the only disadvantage with a deep saw is the weight - take that away and you may as well just have one saw that will trim DT's in a 16 inch wide board. Having said that there will be those who don't want to stretch the extra few quid or never use boards wider than 10" so we will probably end up stocking both sizes.

All in all a very nice piece of kit. Essential? No. Best on the market? Yes.


Anyway, once I'd got over the whole 'David Barron - in my workshop - how cool is THAT!' thing, we had a really good chat about all sorts of tools and techniques. Here's a couple of top tips I picked up for freehand dovetailing.


Always engage the knife in the mark and then move the square to the knife. This is much more accurate than trying to align the square on your mark and then striking a line wherever it ended up.


When securing your board for sawing, use your dovetail marker to set the angle of the board. This way your saw is working vertically (as it was intended to do) and gravity is assisting accuracy rather than hampering it. Cant the board the other way to make the cuts on the opposite side of the tails.

David's DVD covers guided dovetailing - a foolproof way of achieving outstanding results. It is a well thought through technique, with guidance on how to make the necessary workshop aides and also has a very good aside on bench design and configuration. The quality of production and clarity of tuition are both outstanding and I am more than happy to recommend it.