Here is the space that was alluringly titled 'workshop' on the plans, I have a general idea of how I want it to end up but for the time being everything is flexible and open to serendipitous influences.

The first of which happened last week when the builder kindly offered me a few boards of leftover timber that was otherwise destined for the skip – not very straight, blobbed with plaster, but a decent quantity of PAR pine nonetheless and very gratefully received.

In the true spirit of ‘use it quick before he changes his mind’ I have decided to press it into service as a secondary bench. As with all bench builds, the first thing you need in order to get started is a bench. This is my portable bench which is made from 5 x 3’s, (more skip treasure). Two simple A frames with splayed legs, two horizontals that drop onto 20mm hardwood dowels and a top attached underneath so that you can put tools down whilst still having the workpiece resting on the top rails. It’s rough but sturdy and you can clamp anywhere and screw stops onto it as needed so it is quite versatile. (All of the photos are clickable if you want a closer look)

The dimensions for the new bench were largely dictated by the space and the materials, I wanted something quite narrow so that the wall behind can be used for shelving and magnetic toolbars to keep the more commonly used tools visible and accessible. The ladder subframe is 3 x 2 PAR and will be supported on three box section legs. All of the worksurfaces in the shop are going to be 3 feet high so that work can be laid across multiple surfaces if required.

Having double legs presented the opportunity to install bench slaves in two of them to support large boards vertically for edge jointing. By drilling two offset lines of holes to accept pegs I can have a repositionable cantilevered support that sticks out of the front of each leg.

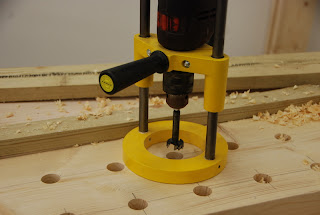
To drill the holes I am using a drilling rig to ensure that everything stays plumb and true. The 25mm Famag Bormax performed perfectly, each hole was cut with a single pass and the last hole was as clean as the first. By carefully clamping the boards in pairs with some scrap underneath I was able to prevent blowout and also transfer the hole positions to the next piece.

The ladder subframe is screwed to the wall for maximum strength and rigidity using BTI Drilltec screws. These have a drill point, an aggressive threaded section, a collar of rifling to eliminate jacking and milling ribs under the head so that they countersink themselves.

Without any pre-drilling at all they went through the timber, a sheet of ply, a sheet of plasterboard and bit home on the steels inside the wall. The torx heads fit over the driver like a spline joint over about 2.5mm, so the engagement is very much better than pozidrive.

The subframe was assembled with leather pads to elevate the ladder section slightly and provide some extra grip – any slightly compressable material will do but leather is ideal and easy to get hold of, a couple of old chunky belts in this case.

I also arranged the timbers carefully so that the bowing of the subframe and the top pieces would act against each other to pull themselves back into square when it was all screwed together.

Although this bench will be mainly used as a table to help keep the main bench clear, it was worth building it sturdily enough to be used as a working bench as well. The apron at the front provides ample clamping area and it is plenty solid enough to support morticing work or bolt machines onto if necessary.
Although the timber would probably have been recycled into paper or chippings anyway, I believe it has been put to much better use and will hopefully give many years of good service.


Looks good!
ReplyDeleteWhere did you find this drilling guide?
Now why don't I know a builder like that. Good job Matthew
ReplyDeleteThe drilling guides are in the Famag catalogue (you can download it from the www.famag.com) everything in there is available to order, just give us a call on 01295 678941. This is the basic guide but they also do spring loaded adjustable angle ones etc.
ReplyDelete